Deploy MCollective in Production Environment
MCollective生产环境安装部署思路
MCollective(后面简称mco)生产环境安装需要考虑到单个client/server节点的安装、ActiveMQ集群、Subcollectives的划分和实际环境等问题,需要分阶段分内容安装部署。这里我把需要安装的节点简单分为三类,具体表示请见图。
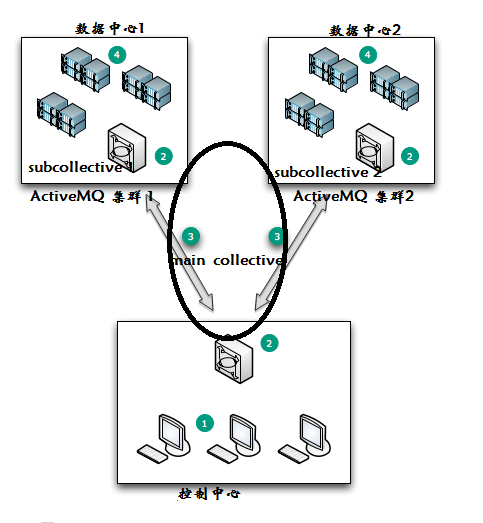
1.Client节点:运行MCollective Client Code。管理员操作中心,它可以直接就是ActiveMQ节点。
2.Sub-collectives主节点:ActiveMQ 节点(Client可选),每个区域(数据中心)都有一个ActiveMQ实例。区域节点只能与本地其他节点通过该中间件通信。这里需要注意main-collective也是一种Sub-collective。
3.ActiveMQ实例间通过使用OpenWire协议通信。可运行在IPSec之上,也支持SSL。
4.Server节点:被管理的服务器,运行MCollective Server Code。不需要与控制中心直接通信。
需要注意的是,一个节点可有多个功能,比如ActiveMQ 节点一般也会是Server 节点,当然它也可以安装Client,成为Client 及节点,根据需求而定。
对于这种安装,每个ActiveMQ 节点可同时为Puppet Master/Nagios实例和其他任何共享的基础设施组件。
软件及版本
Ruby、Rubygems、 ActiveMQ 5.5 => Tanukiwrapper => java(1.6+)、 MCollective 2.0
注:=>表示依赖
基本安装环境
ruby/rubygems
根据功能确定软件
Server节点 MCollective-Server
ActiveMQ节点 ActiveMQ
Client节点 MCollective-Client
基本环境配置好之后,其余所有软件通过相应RPM包安装
ActiveMQ配置
安装完必需的软件之后,就是对中间件的配置。对于ActiveMQ的配置,只需对/etc/activimq/activemq.xml文件几个地方进行修改即可使用。这部分不包括进行读写权限的粒度控制和SSL/TLS等安全配置。对于上图所示的控制中心和数据中心的ActiveMQ节点在配置上基本相同,只是控制中心ActiveMQ还承担着联系其他ActiveMQ的任务,所以需多做一步配置。当然,最终结果除了以上所以的星状,也可以配置为环状之类。
数据中心ActiveMQ节点配置
这里只是指出几处需要修改的地方:
1.broker
<broker xmlns="http://activemq.apache.org/schema/core" brokerName="puppet-broker" dataDirectory="${activemq.base}/data" destroyApplicationContextOnStop="true">
brokerName需要唯一,默认localhost要修改
2.user
<users>
<authenticationUser username="${activemq.username}" password="${activemq.password}" groups="admins,everyone"/>
<authenticationUser username="mcollective" password="secret" groups="mcollective,admins,everyone"/>
</users>
这里的username,password需与server/client配置文件对应。对于用户和组的设置可多样化。
3.authorizationMap
<authorizationMap>
<authorizationEntries>
        <authorizationEntry queue=">" write="admins" read="admins" admin="admins" />
        <authorizationEntry topic=">" write="admins" read="admins" admin="admins" />
<authorizationEntry topic="mcollective.>" write="mcollective" read="mcollective" admin="mcollective" />
        <authorizationEntry topic="mcollective.>" write="mcollective" read="mcollective" admin="mcollective" />
        <authorizationEntry topic="ActiveMQ.Advisory.>" read="everyone" write="everyone" admin="everyone"/>
</authorizationEntries>
</authorizationMap>
这部分是对权限进行细粒度控制部分,一般保持默认即可。更多细粒度权限控制和注册信息可参考ActiveMQ安全。
4.transportConnectors
<transportConnectors>
<transportConnector name="openwire" uri="tcp://0.0.0.0:6166"/>
   <transportConnector name="stomp" uri="stomp://0.0.0.0:6163"/>
</transportConnectors>
这里的两个端口需要注意修改,还有transportconnector name需要注意,如果有openssl设置会在这里增加。
控制中心ActiveMQ节点配置
控制中心只需要增加关于networkConnector信息。
<networkConnectors>
<networkConnector
name="master-puppet"        uri="static:(tcp://master.example.com:6166,tcp://puppet.example.com:6166)"
    userName="mcollective"
    password="secret"
    duplex="true" />
    <networkConnector
name="master-client"         uri="static:(tcp://master.example.com:6166,tcp://client.example.com:6166)"
    userName="mcollective"
    password="secret"
    duplex="true" />
</networkConnectors>
视所选择连接方式和使用ActiveMQ数量,这部分内容不同。还可设置关于ExcludeDestinations信息。
MCollective配置
SubCollective的划分体现在MCollective的配置文件中。使用SubCollectives不仅是网络分流、出于安全的考虑,也为过滤选择主机群时提供强大的-T选项。通过-T可以指定只在某个SubCollective上执行。
cliet.cfg (Client端配置文件)
topicprefix = /topic/
main_collective = mcollective
#指定该客户端所通信的SubCollectives,一般若是数据中心的Client,只与该数据中心SubCollective和main_collective,而控制中心Client,则能够操作所有的SubCollectives。
collectives = mcollective,local,puppet,web
#默认存放代理客户端等文件的路径
libdir = /usr/libexec/mcollective
logger_type = console
loglevel = warn
# 以后内容最好是作为Shell环境变量
securityprovider = psk
plugin.psk = unset
#关于stomp的信息
connector = stomp
plugin.stomp.host = master.example.com #ActiveMQ所在节点
#端口用户名密码与ActiveMQ配置文件对应
plugin.stomp.port = 6163
plugin.stomp.user = mcollective
plugin.stomp.password = secret
# 指定Facts源
factsource = facter
plugin.yaml = /etc/mcollective/facts.yaml
server.cfg(Server端配置文件)
与client端类似,有些相同的配置项所指含义有所区别。
collectives指的是该节点所属哪些SubCollectives
plugin.stomp.host指的是该节点所连接的ActiveMQ节点
注:这里仅包含基本配置,并未覆盖详细配置。
初期代理/应用程序安装
根据初期需求,安装代理:runcommand,puppetd,puppetca,puppetral,service,package
代理Ruby存放在Server端配置文件中指定相应路径的agent目录下。DDL文件可直接只放在Client的Agent目录下。应用程序只需在Client端放置在相应路径下。最后使用mco controller reload_agents重新加载所有代理,应用程序需重启服务。
对于一般的代理会有四个文件(以package作为名称为例):
代理的ruby文件---libdir/mcollective/agent/package.rb
DDL文件---libdir/mcollective/agent/package.ddl
客户端脚本—libdir/mcollective/application/package.rb
Utility classes—libdir/mcollective/util
从Github上下载源码,按照安装方法,将相应文件放到指定目录下,重启mcollective。最后测试安装成功。
故障转移部署
ActiveMQ 配置故障转移池
connector = activemq
plugin.activemq.pool.size = 2
plugin.activemq.pool.1.host = stomp1
plugin.activemq.pool.1.port = 6163
plugin.activemq.pool.1.user = me
plugin.activemq.pool.1.password = secret

plugin.activemq.pool.2.host = stomp2
plugin.activemq.pool.2.port = 6163
plugin.activemq.pool.2.user = me
plugin.activemq.pool.2.password = secret
这样stomp1挂掉了之后会使用stomp2作为故障转移。
ActiveMQ 节点安装Client
按照最初的设想,ActiveMQ节点所连接区域同时是一个SubCollective也是一个数据中心。这样的设置,当某个数据中心出现故障,不会蔓延到其他数据中心。若该数据中心ActiveMQ节点正常,受影响的就只是该Server节点。
blog comments powered by Disqus